My First Print Competition

MDPPA April “monthly” Print Competition

Last night was Maryland Professional Photographers Association‘s print competition and I entered images for the first time since joining Professional Photographers of America last year. I have really been inspired by the artistry and technical talent I’ve been exposed to since joining. There is no doubt in my mind it has upped my game being around these people and seeing how experienced, successful professionals work. So, how did I do? Pretty well. Of the 9 images submitted, 5 of them were merit (80 out of 100 or above) and one of those was in excellent (85-89). So much better than I could have hoped for and I’m really excited.

My most successful images were all shot with my Olympus E-M1 in RAW and then spent some time in Lightroom, Photoshop and ON1 Effects 10.

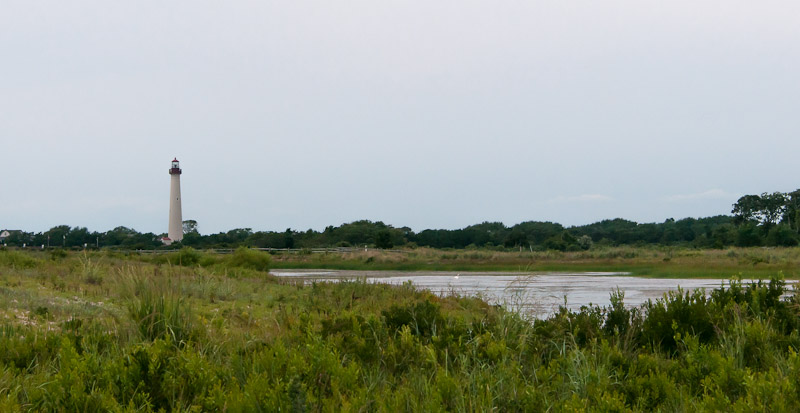
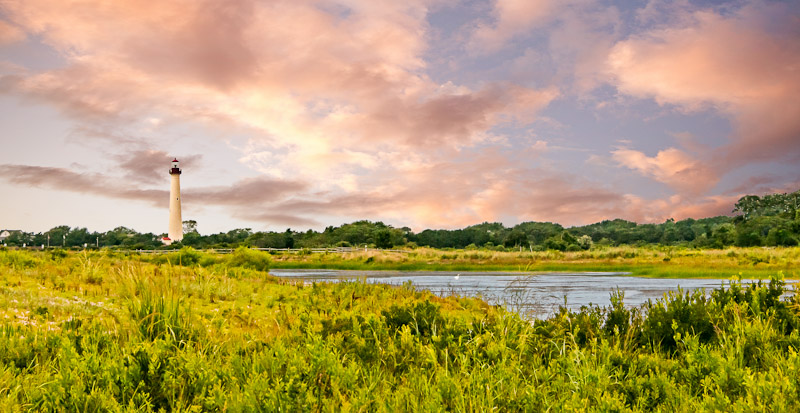
Does your camera see what you do?

Once in a while I will go back through older images that I didn’t have time to really dig into when they were shot. That’s the case with “Locust Point”, which was the image that did the best in competition. The image was shot in August of 2015, but it wasn’t until February 2016 after being inspired by Larry Hersberger at the MDPPA Annual Convention that I went back to work on it. I spent a fair amount of time on the image, once I got started, to make it what I wanted it to be. This was an iterative process with a couple helpful critique’s along the way and a desire to not leave it at “good enough”.

I’m going to show the before and after of this image. Not so much to share with you the amount of work I put in or the skills I’m developing. It is so that you can start to understand the difference between what a camera seesprint-P8130288


and what the photographer sees
Locust Point

As you can see, everything that I saw was not “seen” by the camera and it took a pretty fair amount of work to get it to where I could share what I saw with you. Does that ever happen to you when you take a picture?

Selected Other Images

Here are some of the other images and a little bit of their story.

Fire On The Bayou

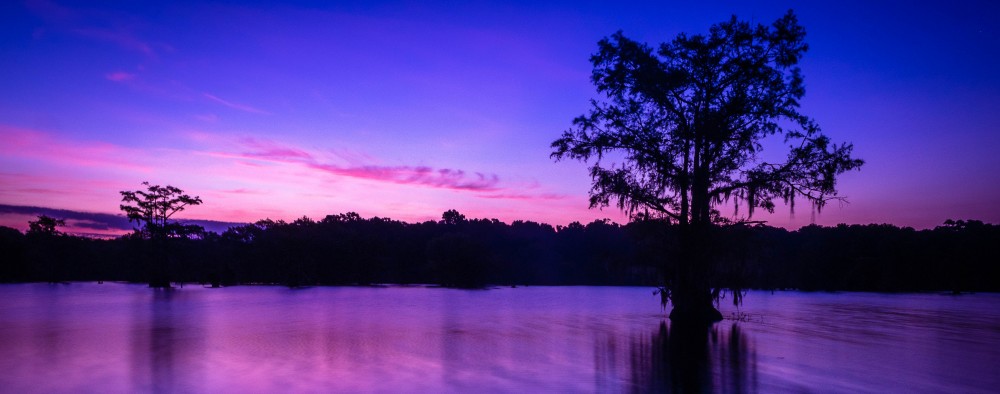
“Fire on the Bayou” – Olympus E-M1 M.Zuiko 12-40 f2.8 PRO

“Fire on the Bayou”

This was shot while on an evening tour of Chicot Lake in Ville Platte Louisiana with my brother in-law. There was very much a “Walking Dead” feel to the Cypress Trees being lit from behind by the sunset.


Purple Dawn

“Purple Dawn” – Olympus E-M1 M.Zuiko 12-40 f2.8 Pro

“Purple Dawn”

This is another image shot while we were down in Louisiana at Chicot State Park with family. There’s a long boardwalk out onto the lake which puts you in the middle of things that was quite close to our cabin.


Those are my images that did the best in the competition. Unfortunately, none of my portrait work made it to merit. Even my favorite image of James “The Amazing” Randi which I captured backstage at the last TAM I attended.

The Amazing Randi

James Randi – Nikon D3s Nikkor 70-200mm f2.8 vrii

But that just gives me new goals and opportunity for improvement. So, I’m excited for the next competition in the Fall!


Facebooktwitterredditpinterestlinkedinmail

One Light, One Modifier

I have the same problem most photographers do, Equipment Acquisition Disorder. It’s ugly, painful and the treatment is very expensive. Yet, every once in a while I’m in remission and I’m able to almost be a normal human being. The kind of person who recognizes how much I already have and what I can do with it. So, in between boughts, I managed to have a couple of successful studio sessions with a single light (Einstein e640) and a single modifier (a Buff 30″x60″ modifier). Not only was I able to have some very different lighting on my model’s face, but it didn’t stop me from getting the looks I wanted.

_BFP6371-Edit

So, I lied a little. There’s an SB-800 with two blue gels throwing a splash on the backdrop. I don’t really count that, but it appears in the next couple of shots. In this shot I was pushing toward short lighting, but I brought the source in nice and close. I used a piece of foamcore (held by an assistant) to make sure her pretty curls weren’t lost on the shadow side.

_BFP6360-Edit

This shot has the same setup, but with the model turned to take a broad light shot. I’ve been enamoured lately with B&W conversions of my portraits and I think there is enough contrast for it to work here. The light was pulled back just a bit to get a little more definition in the shadows.

_BFP6378-Edit-Edit-Edit

Same lighting, with the light pulled back (you have to, since it is such a large source) and my position raised up above the model’s chin level. I really wanted the focus pulled right into her eyes.

_BFP6393-Edit

One light, no fill, no background light. I was going for an old-hollywood feel with this. In Perfect Photo Suite 7, I added blur in Perfect Focus and used Perfect B&W for the conversion.

_BFP6395-Edit

Again, going for the glamour. However, this time, it isn’t a soft and I kept most of the color (although the tones aren’t quite as vibrant, except in the lipstick, to add to the period feel).

So, it’s likely I’ll be back in the depths of my illness and dropping coin on something I desperately “need” sometime soon. However, the next time I’m in remission or shamed by my wife, I’ll try to remember how much you can do with just one light, some patience, and that creativity thing.

Facebooktwitterredditpinterestlinkedinmail

When is it no longer a photograph?

[beforeafter]
before
after
[/beforeafter]
While working on this image, my wife commented that it wasn’t a photograph anymore since it no longer looked just like it came out of the camera. Well, I don’t know about that, but it does fulfill my vision of what this shot was supposed to be.Yes, I added the clouds to enhance the rather lackluster sky and brought out the colors in my mind. Those of a later day shooting opportunity I didn’t have.The bracketed shots were merged using the ‘Merge to 32-bit HDR’ plugin from HDRSoft for lightroom. Tonemapping was started in Lightroom and completed in OnOne Software Perfect Effects . There was a little bit of masking in photoshop to replace the sky.

Facebooktwitterredditpinterestlinkedinmail